
Please see Robyn Lander's V4 cam story for the whole story. The short version is that the '82 - '86 Honda V4 engines (All V4's during this time were susceptible, even VF1000R's w/ gear-driven cams) were plagued with inadequate oiling up to the cylinder heads. This resulted in pitting of the cams, and their subsequent disintegration. Honda was aware of the problem, and replaced people's cams for free until about 1990 or so. In its stock configuration, the heads are lubricated from a pickup on top of the transmission. This oil is 'dirty', low-pressure, and is made to travel through too-small lines to the heads. Note, the stock set-up does seem to function normally above 4,000 rpm, where the oil pump is producing sufficient pressure to force oil through these lines. A number of people have designed ways to remedy this problem. Team Honda (the Interceptor was THE works bike of that time :P ) resolved the oiling problem by drilling above the oil gallery and running external lines up to the heads. A few 'civilians' have completed this mod (see Robyn's page for more info), but for most of us, pulling the engine and dragging it to a machinst whom we'd trust to drill holes in our engines is a little beyond our reach. The second approach was to machine a collar which fit between the oil filter and block and to run external lines up to the heads. This provided clean, high pressure oil through larger lines. The application of either of these mods has shown to arrest further degredation of the cams. Obviously, no one can promise anything, but if you install the oil mod and keep those revs up, you should get 100,000+ out of these engines w/ little further wrenching. Also, not all bikes are affected. Some engines from this time have been run w/o the oil mod for thousands of miles w/ no sign of degredation. Unfortunately, the only way to know if your bike is susceptible, is to pull the valve covers off and look at the cam lobes and cam followers. If you see signs of pitting or scoring on any of these surfaces, it's time to do the mod. If these surfaces are in good shape, you may be one of the lucky ones. Granted, all of this is based on mileage, etc. Some bikes have shredded cams in 18K miles, other shave gone 50K or more before having problems.
This page is dedicated to my trials and tribulations of installing the Dale Walker Holeshot Performance oil mod (which utilizes the collar approach) onto my VF1000F Interceptor.
A brief history thusfar:
In May, 1997, Dave Berkey contacted me saying he had a guy who was having problems mounting his oil mod on a VF1000F. Since we both live in Broken Arrow, he asked me if I could bring my bike by so he could look at it. Upon close inspection, it seems that a VF1000F engine is canted slighty farther to the rear than on a V65 Sabre/Magna. This forces the left-front cylinder exhaust header to travel down directly in front of the oil filter with only about 3/4" - 1" to spare. Obviously the 1.5" that the oil mod collar adds to the length of the filter would prevent it from clearing the header. So Dave talked to his machinist and they've tried to modify the collar to make it shorter, hopefully it will clear.
Met w/ Dave Berkey to try to fit the newer, slimmer, oil-mod collar onto my bike. Alas, even with the narrower CBR/Gold Wing-style filter, the assembly was still too long to allow the filter to be screwed on past the exhaust header. Back to the drawing board.
970702:After a week's delay due to my being in Chicago (work-related trip), we were able to get together to try the VF1000F oil mod v2.0. Dave had succeeded in again reducing the depth of the collar. So much so that the Male/Male pipe onto which the oil filter normally attaches was too long for the collar to mount effectively. So we sacrificed my stock pipe off the engine and hacked it down. The collar was able to mount, but we were still shy of the depth needed to spin the filter on. Dave thinks he can get another 1/16" or so out of the collar. However, the problem we're running into now, is that the male pipe sticks out too far to get the filter lined up to thread it on w/o cross-threading it. If we could get it started it would fit just fine. I'm not sure if any of you have seen the kit in it's current form, but currently there's a Male/Female bolt that screws on to your existing Male fitting on your engine, holds the collar in, and the other end is Male to screw the filter on to. Well, Dave is also thinking of making a Male/Male bolt (The pipe that sticks out of your engine is just a Male/Male threaded pipe w/ a bit of Locktite on the engine side. Comes right out.) So that may be another route.
970715:SUCCESS! Dave Berkey mailed me yesterday and said the 'absolute slimmest' collar was finished. So I dropped by tonight to give the v3.0 mod one last go before we gave up. We used the previously hacked-down engine mount, and lo and behold the bleary thing fits! It's very close, but once the filter is spun on there's plenty of clearance. So, as of today, the problem has been effectively solved. Dave is going to redesign the center bolt to make it Male/Male. This will save people from having to hacksaw their existing engine mount. Once he gets the new bolt back from the machine shop, we're going to trial fit the complete new mod on my Interceptor, and Dave will begin producing them for sale through Dale Walker's Holeshot Performance. I'm not sure if he's going to produce an 'Interceptor specific' mod separate from the Sabre/Magna mod or make them all be the 'Interceptor-compliant' version. The hose length requirements are a little different, and the added complexity of manufacturing 2 different collars, bolts, etc. I will let everyone know what the decision is. So now the question is whether this mod will continue to fit after I install my new Vance & Hines full exhaust kit! :)
970823:The trial install. After many weeks of fretting, UPS finally got off their arses and shipped Dave the last few parts he needed to attempt the installation of the prototype Interceptor oil mod v3.0. I showed up at Dave's about 8:00am Saturday morning. During our last trial-fit session, we located both of the oiling points on the engine and decided that the front bolt would be a holy terror to access. We were correct. Now, according to the instructions that will come with the kit, install the collar first, just to make sure it all fits. We felt comfortable that the collar would fit, so while we were waiting for her to cool, we went about removing the fuel tank, airbox (We had a little trouble here, one of the bolts seized up on us, so we ended up drilling it.), and plenum (that thing that sits over the carbs w/ the boots in it and such). At this point we noticed that the throttle linkage sat right on top of the front oiling bolt. Great. Well, trip to Hardware store for 90 deg. ratcheting screwdriver (certainly worth it for getting that throttle bracket out of the way). We also swung by one of the local Honda dealers here to try to get that airbox screw we had drilled out. But to no avail. Apparently the bolts for an Interceptor airbox are unique, and the dealer doesn't stock them. Much bike sniffing also ensued during this trip, and we made it back to Dave's about 10:30. Time for our first beer as we comtemplate the throttle linkage.
10:40: With the linkage clear and both bolts accessible, it's time to cut the old oil lines. We were able to use the pipe cutter on the left side joint going to the old pick-up point (above the tranny), used a Dremel tool to clear the right side line going to the front bolt. But for the last cut on the joint going up to the rear bolt, we were forced to use the trusty bolt cutters. No going back now. Just hope this thing works....
11:30: We began installing the lines and reassembling the top-end. (Note: at this point it would be a good idea to test the set-up if you're following the directions.) After varied tongue holding and the occasional strong word, we were able to get the carb balancing tubes lined up to go into the plenum thing. Now for the airbox. Well, come to find out, the metal insert that the screw goes into had broken lose from the plastic, so were simply turning the whole assembly. No choice now but to get the thing out. So we fired up the torch, heated it up and out it came. We were then able to use the vise and free the drilled-out bolt. After it cooled we managed to find a bolt in Dave's collection of treasures that fit so we broke out the expoxy and sunk the female insert back into the airbox. While the epoxy was setting up we drained the oil (had planned to change it anyway), removed the existing Male/Male filter mount from the engine block (a set of internal pipe wrenches is ideal here, but since you won't need the mount after the install, you can trash it if necessary. Of course, if you're a tool-hound like Dave, you'll have to go buy a set of internal wrenches :P), installed the collar (NOTE: YOU MUST HAVE 3 7/8" CLEARANCE FROM YOUR ENGINE BLOCK TO YOUR EXHAUST HEADER IN ORDER TO BE ABLE TO SPIN THE FILTER ON. We know we have this on the big Interceptor, but those of you with custom exhaust, etc, might want to check this before ordering.), and attached the lines. We had meant to test the system at this point, but we had another beer and decided to forge ahead.
12:50: We had everything back together except for the tank and we went for our first test. At idle worked great. Gave her a bit to warm up and zinged it. Immediately 1/2 quart of oil showed up on the garage floor. YIPE! We traced it down to the front cylinder joint. We then proceeded to remove all that crap again (airbox, plenum, throttle linkage), and adjusted the front bolt. Dave tried a different set-up with my oil lines that allowed him to order factory lines instead of the custom ones, but after this incident he will go back to the original set-up. So this won't be a problem for people ordering the production kits. This time we tested the system before reinstalling everything, and the leak had been cured.
2:30: By this time we had the bike put back together and running. So we decided to go for a ride. You know, to test the new set-up :P There was a bit of excitement as we had missed a bit of the oil that had leaked previously and had settled on the engine; which proceeded to drain onto my shoe as I made my first right-hand turn. But, after deciding that this was old oil, we went for an uneventful 50-mile ride and lunch. Mission Accomplished!
So, 6 hours and 3 beers later we had succesfully conquered the Interceptor oil mod. We had a number of setbacks, so most can expect it to not take this long. Oh, and be sure to put some anti-seize on those bolts! PRODUCTION NOTE: It is my understanding that Dave will have 2 different kits available. One for the Sabre/Magna, and one for Interceptors. It turns out that the hose lengths were significantly diferent, hence the need for an additional kit. However, all kits will now have the slimmer collar, so those w/ Sabres/Magnas w/ custom exhaust can have the slimmer oil collar w/ the appropriate length hoses. Although, it is my understanding (at the time of this writing) that Dale Walker still has some of the original Sabre/Magna kits, so if you have a custom exhaust, be sure you get a 'new' kit w/ the slimmer collar.
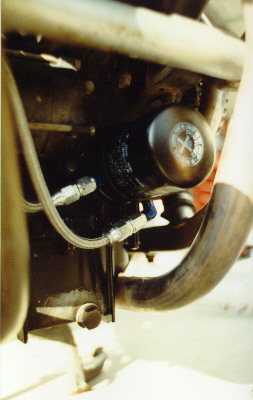
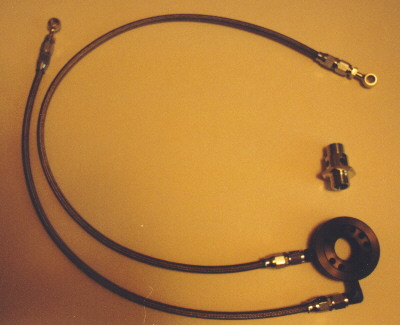
Below are some pics of the kit itself, and after installation.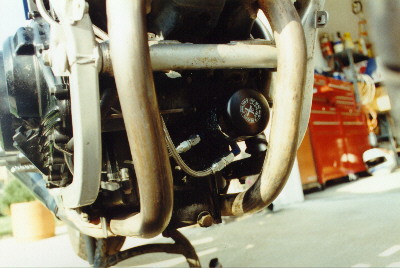
 Back to Strider's Stable